Wednesday, September 7, 2011

Shabby Chic Altered Jewelry Box

Hey everyone! Just wanted to share with you one of our projects that I've recently finished! A couple of weeks ago, my sister and I went...well...just a bit crazy when we went to go hit up our local thrift stores trying to find things to alter. Needless to say we came back with LOADS of goodies that were just BEGGING to be altered. We happened to find three old jewelry boxes that were actually in pretty good condition, despite that they were all missing one single drawer knob! That's o.k. though, we always find a quick way to fix it up!

So to start off, this is one of the jewelry boxes and I knew IMMEDIATELY that I wanted to alter this white jewelry box in a shabby chic style, since the lining of the drawers were a pink suede. The paper collection I used on the box were Pink Paislee's Butterfly Garden. I am just lovin' this collection!


At the top of the jewelry box is a porcelain cherub that my mother had given me a couple of Christmases ago. I love taking random pieces of jewelry, or in this case, sentimental pieces and adding it to projects because it's like adding a little piece of myself into my projects! 


Hope you guys enjoyed checking out our newest project! If you would like to see a video on this project, click below!


- Cydney


Monday, August 29, 2011

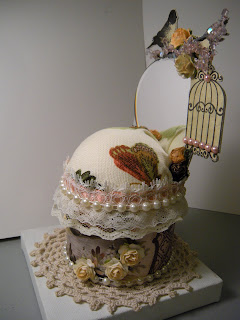
Bird Pin Cushion!!!


Hey everyone!!! I got another project done!! This one is for a scrappy friend on The Scrap Beach ning site!!! Its a pin cushion. I decided to try making one because I was so sick of those ugly tomato lookin ones that you buy from the store. This ones made of 3 used ribbon spools stacked and glued together. I cut in half a foam styrofoam ball (use the soft ones it makes pushing this pin in easier!!!), then covered it with scrap fabric. I covered the sides of the ribbon spools with DCWV Ciao Bella Paper.  I lined the top edge with lace to hide any gaps between the foam ball and the ribbon spools.  Lined the bottom and top edges with pearls. My mom crocheted the doily and I glued it down. I cut a piece of chipboard to line the back and adhered a compact mirror. Placed it in behind the foam ball and glued it down. I decided to decorate the edges of the mirror by stamping some bird image and bird cage on paper and adhered that to chipboard. Then glued that piece with E6000 to the mirror. I also decorated the sides with I Am Roses R4-60, Michael's Christmas purple pick pieced together to create the look of branches.  I had so much fun doing these. I've made two already. I dumped my memory card and deleted the pics of the other pin cushion. Duh!!! Anyways the theme of this one was Shabby Chic Birds!!! I hope to get pics of the other one and then of course I'll show that one too ya too!!! Have fun riding the wave of creativity!!!! Try making one its awesome!!! -Natalie

Saturday, August 27, 2011

Eiffel Tower!!!!! Le Paris

 Here is a gift for my Mom's Birthday!!! Its a plywood Eiffel Tower from Michael's that I painted and primed with Khaki Tan by Americana Paints. My sister Cydney outlined the structure and I hot glue gunned the lines to make the structure stand out. She primed the lines with gray paint and went over the lines with Antique gold Rub and Buff.  Then I mod podged Bo Bunny Et Cetra Paper and vintage music sheets I got in a swap from Mataya!!! Thankx Taya!!! I put lace along the tier sides and just started decorating it!!!

 I filled up the spaces with I Am Roses, G45 cutouts and Tim Holts metal pieces, K&Co lady, Michael's spray, and just had fun filling up the sides.
                             The I am Roses I products I used are......
                             R 77 - 609- Light Purple and White
                             R 4 - 50- Mini Peach (Altered in various colors)
                             R 40 - 526- Large Peach/Pink
                             R 21 - 518- Medium White/ Pink (Altered in various colors)
                             R 77 - 518- Large White/ Pink Roses (Altered in Teal)
 I'm new to Lindy Stamp Gang. I just purchased a starter kit. I saw Arlene's(Mybutterflykisses12) video on the new Lindy's colors.... and fell in love with Drink Me Up Silly Kit so I purchased that one to start off our collection. Well I'm hooked!!! The colors are unbelievable. I only have a few colors of glimmer mist and the bottles always clog and I hate stopping and loosing my creative wave to stop and unclog the sprayer. So decided to try Lindy's. Well I have to stock up on colors because my last order made me hungry for more colors!!!!
                 I used ... My Mojito Green,
                                Dark Chocolate Truffle
                                A Bit O' Bubbly, Cosmopolitan Pink, Fuzzy Nave Peach
                                ( in that order on R 21 - 518)
                                and TA Bahama Blue GM on R 77 - 518
I loved creating this and I'm hoping to go back and get another Eiffel Tower.... It was so much fun. Thanks for visiting ... Come back soon to see what other projects we have going!!!! -Natalie

Tuesday, July 12, 2011

Le Moulin Rouge mini album!

Hey scrappers! Today I'm showing you a mini album I just finished today that I've been working on for a few weeks which is the Moulin Rouge mini album I made for a friend of mine from college. She's graduating today and I just wanted to give her a "farewell" gift before she left since she'll be moving after she has graduated! With this album I mostly used Prima's Moulin Rouge collection along with Webster's Pages Hollywood Vogue since she told me she LOVES 1920's vintage era, especially with all the glamour back then. So since the Prima collection was a little dark, that's why I added some of the Hollywood Vogue papers. Anywho, feel free to browse the pictures below! Have fun scrapbooking!


 The flower is a WOC trellis rose that we got a RAK from Kathryn from the Scrapbeach, THANKS KATHRYN. I alcohol inked it with the Adirandack Ink in Purple Twilight, used mica powder in Sunset Boulevard and stickled the edges with Golden Rod Stickles and stuck a handmade stick pin behind it! Loove it!!

 Regrettably, we didn't buy the sentiments for the Prima Moulin Rouge collection so I had to use a Graphic45 Steampunk one :) 
 Lovin' these transparencies from K&Company. I need to buy more lol my stash is running low!
 She's an artist just like me, so I thought I'd add that sentiment in there!

 I had alcohol inked a timepiece in purple twilight ages ago and never used it, so I thought I'd use it in her mini since it went well with the collection. I ran out of the timepiece spinners, so I cut out this cute little "cameo" portrait from DCWV'S Mademoiselle Collection and put her on the front of the timepiece, glossy accented it and added a WOC flower in her hair.. Also the doilie design came with the woman so I added it on the back of the timepiece, used the broken earring piece that I used from the Victorian Mini, coated it in silver and used some gold rub n' buff on the clock and on the dangle.
 Movie starlet!


Tuesday, June 21, 2011

Victorian Shabby Chic Mini is finally finished!!!

Hey everyone!

Just here to share with you my newest creation! It took me forever to put my heart and soul into this mini and it is finally finished! So here it is! The victorian shabby chic mini! Check out the pictures and the video below!


-Heirloom Anthology

Wednesday, June 15, 2011

Scrapbeach's June Charm Swap - Lace, Love, and Roses!

Hey everyone just wanted to share one our newest creations, which is a charm swap my sister and I were apart of on The Scrapbeach! This month's theme was lace, love, and roses and the color scheme had to include pink. So we gathered a few scraps from the Le Romantique Collection by Graphic 45, and a handful of beads from our stash. The swap also required that we used roses in our charms as well, and since we ran out of the little metal wires, we instead decided to use some mulberry paper roses from Wild Orchid Crafts, and just decided to string the beads onto the flower wire instead and attached that to a jumper ring and attached it to the clasp. Lol funny how us scrapbookers can get creative when we're trying to think of innovative ideas! As for the tag, we used the chair from the Cricut Sentimentals cartridge, reverse crackled it, stickled the edges with Cinnamon Stickles, for the cushions we used pink flocked damask paper so that it will give it a "fabric" feel to it! On the back of the tag we decided to use the language of love, cause what better to express it than in the French language, right? That's it for now! Hope you guys enjoyed it and keep creating!!


Saturday, April 30, 2011

12x12 Mademoiselle Canvas Layout

Hey everyone!

 We are back with a new project that we have been working on for awhile.. it is only semi-complete but it's almost done. We were so happy with how it turned out that we couldn't wait to finish it so we just decided to make a video (our first one yay!) of the layout! So sit back and enjoy the video! :) Bye!

-Cydney
Heirloom Anthology

Saturday, April 23, 2011

New projects!!

Hey everyone!!!

Sorry for not posting these last few weeks!! Been very very busy with graduations and parties! Whew! But now that it is over with, we can finally sit back and concentrate on doing what we love most! Yep that's right......SCRAPBOOKING! :) So here we have a few new projects we have been working on thanks to the wonderful ideas from JadeStudios and you can check her blog at: http://jadedstudios.blogspot.com/ Thanks to her, we've been inspired to create a cake stand, as well as an easel card. We had so much fun making these, I can't wait to show them off!


So with this cake stand, we decided we were going to make Easter chick cake pops and use the cake stand as our display, so instead of making the pedestals short, we made them a little taller so that they won't touch the cake pops. We also put a wooden dowel through the middle of the ribbon spools to give it some extra support.


We also made an easel card that was done from Jade's Youtube tutorial. My sister decided to make her longtime best friend a card that could go on her desk. With this card, we used the meadow paper from the Immortal Love Collection, as well as the crosshatch and purple floral paper from The Mademoiselle Stack by DCWV. It is accented with Recollection curly roses, as well as a fashionista stamp cut-out from Graphic45. Hope you guys enjoyed our projects and inspire you to make wonderful creations of your own! :)


-Heirloom Anthology

Sunday, March 20, 2011

New Projects!!!!!!!

Yay!!! Finally, we've got some new projects to show you! The first one below is an altered dress form from Michaels. On this dress form, we used the Immortal Love Collection by DCWV and just decided to GLAM IT UP!This will be going to a special friend of ours, but decided to give you guys a special sneak peek because we will be selling Immortal Love kits that includes a dress form just like this one!...yes all you Twihards heard me ;) so come back and visit to see how you can get these kits!!

The dress form is accented by red roses from Joann's, as well as a film strip elegantly draping around the entire dress, with a picture of Jacob, Bella, and a crescent moon.The wolf silhouette is made out of polymer clay to make it look like it is howling at the moon. We then added a brown glittery christmas pick to accent the chipboard trees that came with the collection. The Tim Holtz adage ticket is held by a Tim Holtz trinket pin that says "Thoughts".


Next project!!! Now most of you know already that Michael's has these wonderful cute little balsa boxes for sell right? After seeing numerous videos of how people altered theirs, we decided to try it! I can honestly say that my sister and I had a blast altering these cute little boxes and making minis for them! I think these have to be the smallest mini albums we have ever made! I apologize for the dark and blurry pictures! We will post videos of these on http://www.thescrapbeach.ning.com very soon!


Reminiscing...

Hey everyone!!

Thought I'd drop in and make a quick post! My sister and I finished a few new projects today, but before that we would like to post a few pictures of some of our older work! I still had photos from when we first started making scrapbooks in my camera and decided to share some of them with you! Hope you enjoy~!

 Le Romantique Gatefold Album
 Christmas Past Gatefold mini album
 Christmas Past Gatefold mini album #2
 Christmas Past Gatefold mini album #3
 Rock Princess Flag album
 Altered Book Box
 Le Romantique Gatefold mini album
 Le Romantique Gatefold mini album and altered box
 Altered Book Box #2
 Yay! Here we are at a local boutique selling our minis back when we called ourselves "Enchanted Memoirs!" This was so much fun!
 My sister was playing peek-a-boo! Lol!